I’ve had a few friends reach out asking how I make these adorable dog bone ornaments so I thought I’d share the process with you. If you want to view the video demonstration, scroll down a bit.
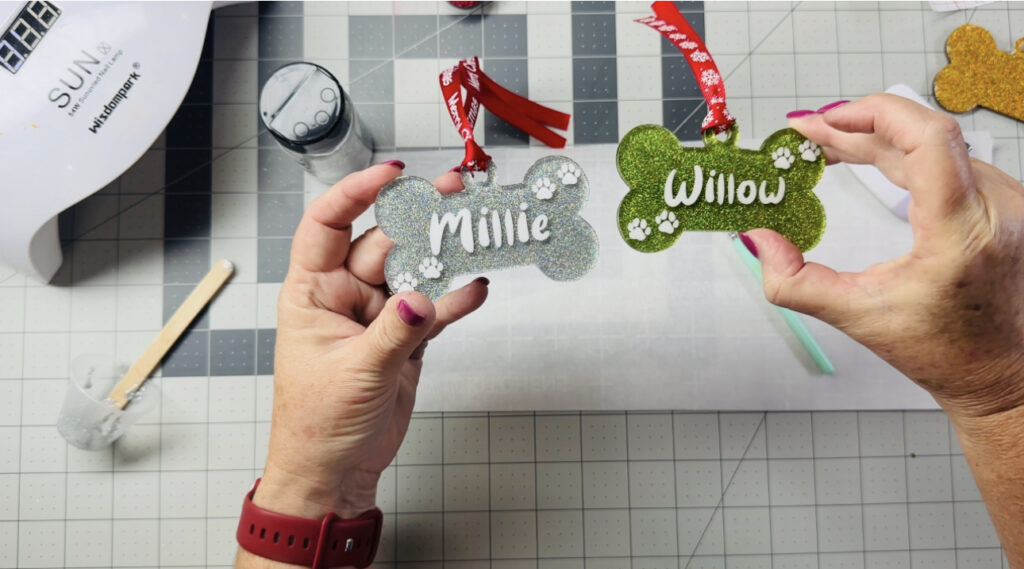
These are a lot of fun to make with your favorite glitter. For these, I’ve used holographic glitter that sparkles like there’s no tomorrow. I made a dog bone ornament that says “Willow” for my sister’s new puppy. She’s got 2 fluffy friends, so in my video, I made another one for her little one, Millie.
Here’s a list of materials used. These are Amazon affiliate links, so if you make a purchase using them, we may earn a few pennies to help support this blog. Thank you!
➡ Cricut Joy Xtra – https://amzn.to/3ReOkuo
➡ Cricut Joy Xtra Standard Grip Mat – https://amzn.to/3RsdR3r
➡ Cricut Joy Xtra Smart Removeable Vinyl – https://amzn.to/46Agh4D
➡ Transfer Tape – https://amzn.to/3t6ZbfV
➡ Weeding Tool – https://amzn.to/44SZhoV
➡ Let’s Resin UV Resin – https://amzn.to/3PIZTbd
➡ UV Lamp – https://amzn.to/3PISaL8
➡ Dog Bone Acrylic Ornaments – https://amzn.to/48o5LyM
➡ Silicone Brush – https://amzn.to/3riVdQS
➡ Medicine Cups – https://amzn.to/3LpcQWg
➡ Popsicle Sticks – https://amzn.to/3RsyKLN
➡ Gloves – https://amzn.to/3PJhK2B
➡ Lighter – https://amzn.to/3ZljsdT
➡ Ribbon – https://amzn.to/3PHH754
➡ Holographic Glitter – https://amzn.to/3PU8JEl
First, I put on my gloves and added just over 25ccs of resin to my medicine cup. I added a little glitter to the resin and stirred it with a popsicle stick.
Using my weeding tool, I removed the protective cover that came on the acrylic dog bone, but only on one side. I wanted to keep one side covered in case my resin ran over the edge.
I do this a little differently than some of the other crafters you may have seen, so hang with me. Once the glitter was mixed in nicely with the resin, I started adding it to the acrylic and spreading it around. You can use either the popsicle stick or the silicone brush. I started with the corner circle and added the resin to the center of those circles, pushing it out towards the side. I kept adding resin until the entire acrylic piece was covered.
Then I used a lighter to pop any bubbles. I went around the acrylic a few times, looking at it from different angles under different light, adding more resin where needed and making sure the resin was pushed to all sides.
If one coat of glitter resin didn’t give it the full coverage I liked, I sprinkled a little more glitter on top before covering the acrylic with the UV lamp. Then I let the lamp work its magic for 99 seconds.
It looked great, but I wanted a nice shine on top of that glitter, so I add a clear coat of clear resin the same way I did before, then put it under the lamp to set. That shine was awesome!
I used my Cricut Joy Xtra to cut the vinyl that said Millie along with some paw prints. Using transfer tape, I added these to the acrylic where I wanted them.
The last step was to seal the vinyl with a layer of resin, the same way we did before.
I loved how this turned out and added a ribbon to it to complete the ornament.
Did you enjoy this project? Do you have any tips to share? Let us know in the comments section below. We appreciate every 👍 and would love it if you’d subscribe to our channel! It’s free! Subscribe here ➡ https://www.youtube.com/@FamilyUnit?sub_confirmation=1.