HTV stands for Heat Transfer Vinyl, sometimes also called iron-on vinyl. It’s the same exact thing. Felicia compared five of the most popular heat transfer vinyls against each other in the official 2023 Family Unit Heat Transfer Vinyl Showdown, now on YouTube. We tried HTV from Cricut, HTVRont, Teckwrap, Michaels’ Make Market, and Hobby Lobby’s Four-Oh-Five. Before we get to the results, let’s talk about proper HTV transfer time, temperature, and pressure.
DIFFERENT TYPES OF HTV
There are several types of heat transfer vinyl with different looks, textures, and functionality for just about any type of HTV project. Here are some of the most popular:
- Standard: Standard HTV, or sometimes called Everyday Iron-On vinyl, comes in many matte and glossy colors, and can be layered on a variety of materials including cotton, poly blends, glass, wood, canvas, and others.
- Flex/Stretch: Flex/Stretch HTV is slightly thinner than standard HTV and is designed to stretch and flex, resulting in better durability with less cracking for longer lasting T-shirt designs. It is available in many solid colors.
- Holographic: Holographic HTV has an iridescent finish and comes in many colors. It should not be layered underneath another layer of HTV.
- Foil: Foil HTV is metallic with a reflective mirror-like shine and comes in various colors. It looks amazing! It is quite thin, and we’ve found it to be slightly less durable than typical standard vinyl.
- Glitter: Glitter or reflective heat transfer vinyl is smooth with a reflective glitter finish and is available in many color combinations.
- Puff: Puff heat transfer vinyl looks and cuts flat, and becomes dimensional as it puffs up when heat and pressure is applied.
- Other: There are several other less popular but fun types of HTV including printable HTV, color-changing HTV, and even glow-in-the-dark varieties.
All types of HTV work well on a variety of materials, including cotton, polyester, nylon, canvas, faux leather, glass, metal, wood, corkboard, cardstock, neoprene, and felt.
You can choose the specific type of HTV for your project based on the material you are using and the desired look.
COMMON HEAT TRANSFER VINYL (HTV) PROBLEMS
Making great iron-on t-shirts with any brand of HTV requires a little more than luck. We’re talking physics and chemical bonds. Don’t worry about the complicated math and chemistry required to make this work – really smart engineers have figured out all the hard stuff. However, your responsibility for making successful HTV iron-on t-shirts of high quality requires three simple things:
- Time
- Temperature
- Pressure
Each brand or type of iron-on or heat transfer vinyl has its own time, temperature and pressure requirements that, as we found, may vary widely. When using HTV, always check the instructions included with the packaging of the specific vinyl you are using, and try to apply your settings as closely as possible. There is a certain level or tolerance built-in to each brand and type of heat transfer vinyl, so don’t worry if your settings or procedure are not exactly perfect. As long as you’re in the neighborhood and follow the instructions as closely as you can, your iron-on should come out fabulous and last for several washes.
HTV has a liner or ‘carrier’ sheet covering the front side of the vinyl. The carrier sheet is usually clear and looks shiny. The reverse side of your HTV usually looks dull and doesn’t feel as smooth as the carrier sheet. There’s actually heat-activated glue on the back, which allows your final cut design to stick on to your final product, whether that’s a t-shirt, pillow case, hoodie, wood sign, canvas, or whatever magic you decide to create. Something called a “heat press,” which is basically an iron, activates the glue.
For a successful HTV application, you’ll put the dull side of your HTV directly on your project and apply a specific amount of heat for a specific amount of time in a process known as “heat pressing.” To be honest, it’s really just ironing – Felicia uses her heat press as a clothes iron! Once the time is up and the liner sheet cools, you can remove it, leaving only the gorgeous vinyl design your cutting machine made on your fabric or creation.
Too little heat, time, or pressure may result in vinyl that peels off immediately, during the first wash or wear, or after just a few washes. When applied correctly, it’s not unusual to have an HTV t-shirt last for 50 or more normal cycle washes and dries. Tim has some HTV shirts he has washed right-side up over 70 times and they still look great. More on caring for HTV shirts a little further down in this article.
It’s also a good idea to use a lint brush or roller to remove any excess fabric, hair, dirt, or dust that may interfere with the proper setting of the HTV adhesive. Most manufacturers also recommend to apply the heat to the shirt for a few seconds to help remove any excess moisture in the garment.
REMEMBER TO “MIRROR” WORDS AND NUMBERS
Unlike making decals or stickers, all types of heat transfer vinyl need to be “mirrored” before cutting. This means flipping your design in your cutting software so it appears backwards on your screen. Don’t worry – it will look normal on your shirt! This is important if your design has any words, numbers, or phrases so that they appear in the right direction when applied to your project. There is a mirror setting in most cutting machine software, and some programs will remind you to mirror your design before cutting HTV.
HEAT TRANSFER VINYL TRANSFER TIME
If the ironing time is too short, the HTV adhesive may not have enough time to melt properly and may not stick to the fabric. Pressing or ironing too long can burn off the adhesive too much, causing it to fail. HTV works by using heat activated chemical adhesives. You need to find the specific time for the specific HTV vinyl you want to use. Most HTV manufacturers include the recommended time and temperature settings in the printed materials that come inside most HTV packaging. If you can’t find it, we’ve listed the time, temperature, and peel recommendations for each of the five heat transfer vinyls we tested later in this blog post.
Always remember, do NOT wash (or wear) any HTV t-shirt, sweatshirt, hoodie, pants, bag, or whatever beautiful HTV creation you made until at least 24 hours have passed. Most HTV manufacturers state the adhesive needs a solid day in average room temperature and humidity to set permanently.
USING THE RECOMMENDED HTV TEMPERATURE
Not all vinyl adhesives respond to the same temperature. Check the manufacturer’s instructions and recommendations for specific heat transfer vinyls. A professional heat press is great for this task since you can precisely adjust the temperature and time. Too low or too high of a temperature may cause HTV to fail to adhere.
Peeling, the process of removing the liner or clear carrier sheet from the vinyl once heat pressed, is also a temperature-related recommendation. Some brands prefer cool peels and some recommend warm peels. Cool peels are peels that have cooled to room temperature before you remove the clear transfer material, and usually require waiting several minutes after your design has cooled. Warm peels are peels while the design is no longer uncomfortably hot to the touch, but warm enough to handle comfortably.
Here are the recommendations of the HTV products used in our testing.
- TECKWRAP HTV: medium press at an oddly specific 266°F – 284°F for 8-12 seconds, cool peel.
Note the directions in the package we used for this project were different. We deferred to 305°F for 10 seconds, as close as we could get to the 302°F shown on packaging instructions. - FOUR OH FIVE (Hobby Lobby) HTV: medium press at 280°F to 315°F for 25-30 seconds, warm peel
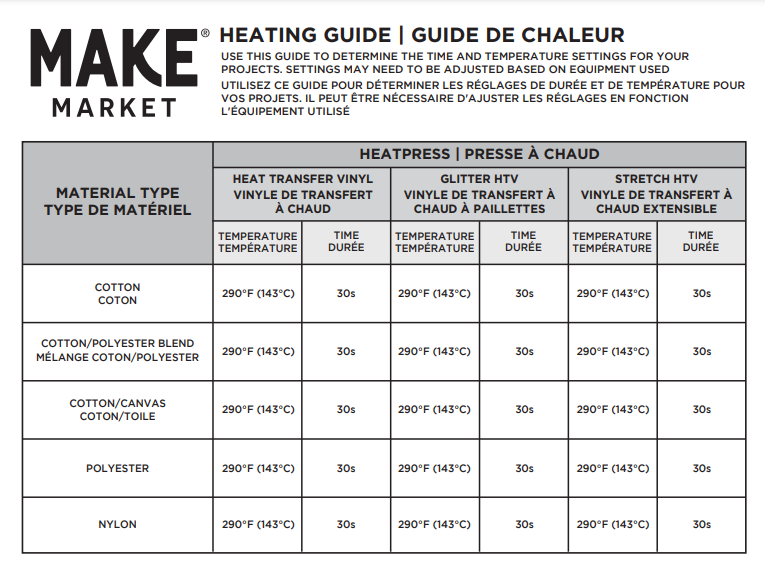
- MAKE MARKET (Michaels) HTV: medium press at 290°F for 30 seconds, warm peel
- HTVRONT HTV: medium press at 305°F for 10-15 seconds, warm peel
- CRICUT HTV: medium press at 315°F for 30 seconds, cool peel
Note the directions on the website using their automatic heat press were slightly different. We deferred to 40 seconds as shown on website instructions.
Most HTV manufacturers recommend covering your HTV and underlying fabric with a protective cover sheet. This protects the base material and vinyl from direct heat, while still transfering the appropriate amount of heat where it needs to be. Felicia typically uses a specially formulated Teflon sheet, but you can use parchment paper, uncoated butcher paper as a cover sheet.
PROPER HTV PRESSURE
This is the least important factor when using HTV. Manufacturers recommend a certain pressure, but they realize it’s virtually impossible to properly measure or communicate what the correct pressure is for home users, or for you to apply that perfectly recommended pressure. Most settle on “medium” pressure, which basically means the heating device plus a little elbow grease.
Nonetheless, this is a sore spot for many home users. Using an iron on a soft ironing board instead of a heat press and the recommended heat mat may result in too little pressure. On the other end of the spectrum, pressing your HTV designs on granite, stone, metal, or other surfaces that dissipate heat may result in too much pressure, causing your vinyl to overheat, or potentially allow too much of the heat to escape for a solid adhesion.
Plus, it is very difficult to press larger designs consistently with a home iron, since you’ll need to apply the iron multiple times at the recommended time, temperature, and pressure, in different places.
Good pressure is when you are able to see the weave of the fabric through the vinyl. Obviously, you can’t see this while you’re applying pressure, so you’ll need to rely on practice, success, and muscle memory. If you are not sure whether your household iron gives enough pressure, put a little of your own weight behind it.
Again, pressure is the least important requirement, so don’t worry too much. As you begin to practice, you’ll learn what the right pressure is for perfect HTV applications every time.
Professional heat presses take care of this problem for you. One way we test the pressure is by putting a piece of parchment paper in the press and close the press on your clothes. If you are not able to pull out the paper easily, the pressure is probably good. If you can’t pull it out at all, it might have too much pressure. Too much pressure may melt HTV adhesive and cause a fail to adhere. Consider the thickness of the fabric. A sweatshirt will probably require a little more pressure than a t-shirt.
CARING FOR YOUR HTV CREATIONS
Heat transfer vinyl manufacturers have offered several suggestions for enhanced life and durability of your HTV designs on clothing.
- It’s recommended to use new garments with no pre-wash. Pre-washing can cause buckling in the shirt and result in wrinkles in the vinyl.
- Wait at least 24 hours before wearing clothing with an HTV design. Sweat and body heat can affect proper adhesive setting.
- Wait at least 24 hours before washing garments with an HTV design to allow proper setting.
- Before washing, turn the garment inside-out so the HTV is on the inside of the garment and won’t rub against other clothing.
- Always wash in cold or warm cycles, never hot.
- Use mild detergent, and avoid bleach and other strong cleaning chemicals.
- Air dry or tumble dry on the lowest possible setting to avoid reactivating the high temperature adhesive.
HTV EQUIPMENT AND MATERIAL RECOMMENDATIONS
Here are our Amazon Affiliate links to the products used in our HTV Showdown video. If you make a purchase using our links, we may earn a few pennies from your purchase to help support our blog and YouTube video making efforts. You might even save a few dollars!
👉 Cricut Maker – https://amzn.to/3EOBfRc
👉 HVTRONT Auto Heat Press – https://amzn.to/3RQmLrZ
👉 HTVRONT HTV – https://amzn.to/3LCkn46
👉 TECKWRAP HTV – https://amzn.to/3Fau71X
👉 Cricut HTV – https://amzn.to/3Rtld6U
👉 Cricut Standard Grip Mat – https://amzn.to/3ZwrGzT
👉 Cricut Brayer – https://amzn.to/456jbwK
👉 Cricut Weeding Tool – https://amzn.to/3PwXrUL
👉 Cricut Trimmer – https://amzn.to/459XETM
👉 Teflon Sheets – https://amzn.to/450xFxX
✅ Need more crafting products?
👉 Visit Cricut’s Site for all things Cricut: https://cricut.pxf.io/QOaOBa
👉 Check out our Idea List for yourself for great holiday gift ideas: https://amzn.to/46jF0cX
👉 Visit Our Etsy Store! https://www.etsy.com/shop/FamilyUnitOriginals
👉 Some of our favorite vinyl is from Teckwrap: https://www.teckwrapcraftaffiliateprogram.sjv.io/Gmg2oE
HTV SHOWDOWN RESULTS
Here is what we found in our heat transfer vinyl testing. Which HTV is the best? Is there any difference?
Text, images, videos, and content © 2023 Fresh and Felicia. All rights reserved. No unauthorized reproduction, duplication, or distribution is permitted without express written consent from Fresh and Felicia.