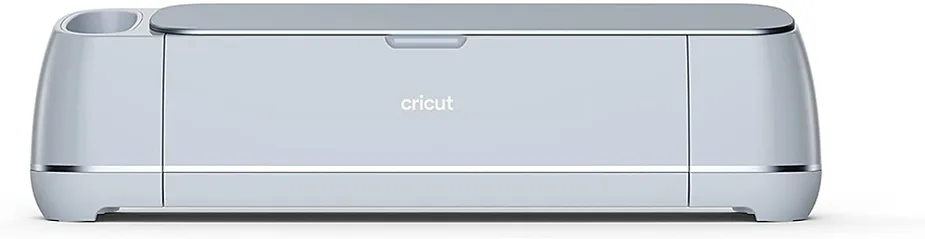
What can you do with the Uninet iColor 560? Maybe a better question is what CAN’T you do with it! Our biggest challenge with heat transfer vinyl and inkjet sublimation was printing full-color on dark surfaces and garments. The iColor 560 solved that problem using their patented white overprint and underprint printing systems. And they look fabulous!
Printer Setup
Environmentally, laser transfer is a little picky, but not so bad. We’re talking chemicals here. So you probably won’t want to work out of your un-airconditioned Miami garage. Your iColor 560 will work best in balanced humidity between 45% – 65% with an optimal Temperature Range: 50°F – 75°F.
Use a dedicated circuit of at least 15 amps if you can, to avoid potential circuit flips. Maximum power consumption is about 11 amps on the 120v models.

The IColor 560 comes complete with a total of 5 toner cartridges for full color CMYK printing, as well as their amazing fluorescent white cartridge. This enables you to add white as a spot color on dark paper or garments, or to print a white underprint or overprint in concert with the IColor ProRIP software. Composite black is also available when using white toner.
There’s also the option to add fluorescent toner or dye sublimation toner upgrade kits, as well as the exclusive IColor Security, clear, gold and silver toner options.
Vector and line art images, including text, are likely to produce the best results. But we’ve seen some remarkable results with gradients and photographs too.
I know, I hate reading manuals too. But it’s important. It’s on your flash drive, and available online. This printer isn’t cheap – so do the right thing when you’re not sure what you’re doing.
Remove the security tape and packing material from inside the printer. Carefully remove the black security paper from the white toner cartridge. Remove and gently shake each cartridge back and forth 5 or 6 times to loosen the toner that may have settled during shipping.
The first slot will accept either white or black toner. It depends on the type of printing you’re doing whether CMYK, Underprint or Overprint. Don’t sweat it though, the ProRIP software will tell you what to use and where.

You can open the side panel to reveal the communication ports. Insert either the USB or Network cable, not BOTH, depending on how you wish the software to communicate with the printer. Or, if you are connecting via Wi-Fi, do not connect either the USB or Network cable. You’ll just confuse the software – and yourself.
Insert power cord and power on the unit. You can configure the wireless LAN settings for the machine from the control panel of this printer using the Wi-Fi Setup Wizard using WPS, or entering your SSID and password manually. A router is necessary to set up a wireless connection, because your printer will need its own local DHCP IP address. Yes, you can make it static if you want, and that’s always a good idea.
Design files can be printed directly from your favorite graphics program, as well as imported directly into IColor ProRIP. The IColor ProRIP software allows the user to control the spot white channel feature, as well as spot-color overprinting, where white is printed as a top color for textiles. No need to create additional graphics with different color configurations – the software does it all – and in one pass. Enhance the brilliance of any graphic on darker garments with white behind the color.
Let’s install the software.
Make sure all other programs are closed, and it’s really best if your antivirus software is uninstalled. Windows Defender is the only program which, to date, has not affected the functionality of the ProRIP software.
Some of the more popular paid antivirus software programs can monkey with your firewall settings and can lead to problems with the installation and/or use of software.
Plug in the included dongle into a free USB port on your PC. It’s a full-sized USB, so you may need an adapter for newer computers. This dongle contains all of the software, manuals and documents for your printer and software and also serves as your license key. The dongle must be inserted at all times when installing or running the program. With that said, keep in safe.
Navigate to the setup folder on the dongle and right click the setup file and select ‘Run as Administrator’. You can install the 64-bit system in most later computers. Follow the instructions on your screen.
You may be prompted to install .NET Framework, which is a necessary component of the ProRIP software. Accept the license terms and click ‘Install’. This installation normally takes several minutes to complete so be patient.
ProRIP First Time Setup
Be sure the IColor ProRIP dongle is installed and you are connected to the internet. From the Windows Start menu, choose All Programs >> IColor ProRIP or double click on the desktop icon that was created upon installation.
Once the ProRIP opens, the Queue Wizard will begin the installation of the support files for your IColor printer. Click ‘Next’ and then ‘Install Printer’.
Select the IColor 560 from the menu. Click ‘OK’. It’ll advance to the next page where it will automatically search Uninet’s Cloud Server for the official printer package. Click ‘Next’ to continue the installation. Note that you may already see the printer installed in Windows. This installation is for RIP functionality.
Next, click the ‘Port Setup’ dropdown and select how your printer is connected. If connected via network, choose TCP/IP. It’s best to set a static IP address for your printer so that the IP address does not change later if your router loses power or your network is reconfigured. If connected by USB, choose the printer as identified in the drop down. For USB connections, the proper port will have the printer name in the description.
If you need to change or reset the ports in the future: Click Queue >> Manage Queues to view, update or change the port settings.
Select the proper Print Queue for your project. Then, select the Print Mode (otherwise known as media type) and verify the size of that media before importing your graphic.
Import the desired graphic by clicking the ‘green plus’ icon and navigating to the proper folder. You can also import by clicking File > Import File, or simply dragging and dropping your file into the queue.
Once your image is loaded, you’ll notice the preconfigured settings relating to the media being used in the printer. The ‘Queue’ tab shows the size of the media that will be used, where to load the media into the printer and the paper type setting recommended. Each media type will contain this preconfigured data to make your printing experience as easy as possible. Overriding these settings is possible, but could yield undesirable results.
To alter the color settings, click on ‘Color Adjust’ and adjust as needed. ‘Coverage %’ represents the amount of white/clear toner overprint or underprint (depending on which queue is being used). We’ve found that more coverage looks a little better in some cases, but note that your toner use and cost of materials will increase. You’ll find the ‘sweet spot’ as you figure out your workflow.
The ‘Vary hole size in areas of transparency’ option allows for rasterization of colors that fade into nothing and to retain partial transparency. It is suggested that this option is left on, as it will only apply itself where it’s needed.
‘Choke dictates how much the overprint white layer is pulled in under the colors. The higher the number, to more it’s pulled in (to avoid a white outline around your graphic).
The ‘Page’ tab offers the ability to print multiple copies and nest images. You can also adjust the size of the image to fit your media here (and in the Queue tab).
The ‘Job’ tab allows you to lock the proportions of your image to maintain the aspect ratio. Here you can also mirror, rotate and invert the image, as well as adjust the margins of the print if necessary. Note that the mirror function is turned on automatically for any image loaded into the overprint queue. That’s smart!
You can also adjust the size of any image by dragging and dropping the corner of the image in the preview pane. Adjustments can also be made by using the sizing or positioning icons at the top of the screen.
UNINET has created three configurations referred to as ‘Print Queues’ to suit any printing project:
The CMYK Queue is for standard print jobs that do not require a spot color, best when printing on white media and for Dye Sublimation prints.

The Overprint Queue is for printing white as an overprint, typically used for transfer printing. This is what we use to make prints for dark garments. For this configuration, the white cartridge is placed in the first slot of the IColor 560 printer. White prints on top of the colors so that when it’s transferred to garments or hard surfaces, the white spot color and colors under it really shine through.
The Underprint Queue is for printing white as an underprint, typically used for transparencies, clear labels, or dark media. White is installed in the last slot of the IColor 560 printer, where the white is printed first, as an underprint, all in one pass. In this situation, the RIP knows to make composite black using CMY, and puts in white, not only as a background color, but also in the image where white or page white is specified.
The software also allows for color manipulation and removal, rasterization, cost calculation, professional layout tools and direct printing from your favorite graphics program. Honestly, it’s quite badass, and it ships standard with all IColor Printers.
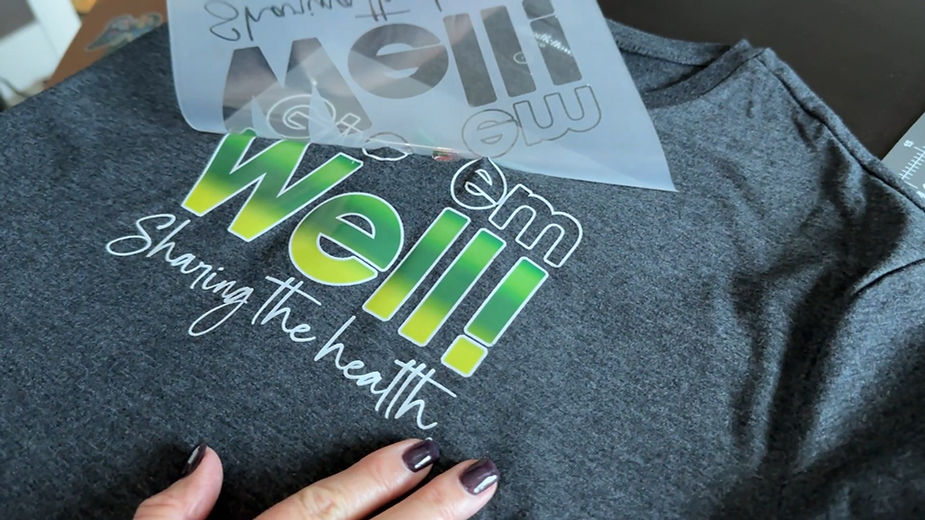
So let’s try an overprint project for a dark t-shirt, something we’ve never been able to do before we got our Uninet iColor 560!
Let’s get this straight – this is NOT a simple vector image optimized for the iColor 560. It’s more of a real-world example of something weird someone might want to print, and a great example of how the white overprint helps all these colors and gradients, including white, really pop on dark surfaces.
It already has a transparent background, so we won’t have to fool with this one. But, you can you’re your image using features including KnockMeBlackOut or KnockMeColorOut, and see the results in real time on the screen as you fine-tune your edits.
White toner performs the following functions:
- As a background layer that helps colors show through on a dark garment.
- To fill in the halftones on lighter images so that there is enough toner on the page to fully transfer to your garment or to pull all the adhesive away.
This is why you should really use white toner all the time, YES, even when printing on a white garment, and even if there is no white at all in your artwork.
You can even preview what it’ll look like on your final media. When you’re ready, hit print and send it to the iColor 560. The ProRIP software defaults to the bypass tray. When ready, click the ‘Print’ icon to print your graphic. Your media is loaded with the print side facing up. The tray has stickers to tell you which way is up, and that’s smart.
Incompatible transfer media should not be used. The iColor ProRIP print mode dropdown contains a list of all certified media.
Once the print has completed, the job will be archived in the reserved area for 7 days. If you wish to reprint that job, drag and drop the job from the reserved section into the proper queue.
Heat Transfer

Let’s get your perfect print on to a t-shirt! First, we’ll need to marry your laser print to an adhesive transfer sheet. Basically, we’ll use heat to loosen up the glue, and that glue will attach only to the laser toner and ignore the sheet if all goes well. This is why you’ll need a reliable, professional heat press with even temperatures across the heating platter. Too hot, and the glue will melt or spot all over the transfer sheet. Too cool, and the glue won’t transfer at all.
Preheat the press to 310°F / 154°C and keep the press closed for at least 5 minutes before proceeding to heat up the lower platen.
Place the adhesive sheet on top of the print, adhesive coated side down – the image and the adhesive should be face-to-face. Adhesive side is the non-marked, smooth, coated side. It helps to fold a corner of the adhesive sheet before pressing. This gives you a good place to start when you ready to peel.
Cover the two sheets with kraft paper, a teflon sheet, or the included IColor black cotton cover garment and press the two sheets together in the heat press at 310°F / 154°C for 120 seconds with medium pressure.
Open the press and immediately, yes, while still hot, carefully rub the sheets with a piece of textile for about 5 seconds, then peel the adhesive sheet away from the transparent transfer sheet diagonally in one slow, low and fluid motion.
Many people will trim off the edges of the transparent transfer sheet to ensure no excess adhesive sticks to the garment, avoiding the chance of a white box appearing around your design.
At the same 310 degrees, place your garment on the heat press. Position the transfer sheet (print side down) onto the garment. You can use heat resistant tape to secure the sheet to the garment to ensure the transfer sheet won’t lift prematurely or shift before being pressed.
For 100% COTTON shirts, cover the transfer sheet and garment with kraft paper or teflon sheet and press the garment using a heat press at 310°F / 154°C for 30 seconds with medium-high pressure.
If you are pressing onto 50/50 cotton/poly, press at 285°F / 140°C. If you are pressing onto 100% poly, press at 265°F / 129°C. Spandex or Lycra material is not recommended at this temperature.
You can perform this step ONLY as low as 250°F / 121°C if necessary to avoid dye migration on polyester fabrics, avoid damaging delicate textiles and to retain vibrancy.
Remove the garment from the heat press carefully and immediately lay flat. Allow it to cool for at least 5 minutes. Removal while still warm could lead to an incomplete or faulty transfer. Perform this step within 60 mins or less.
Once the garment is completely cooled, carefully peel away the transfer sheet in one smooth, continuous rolling motion. It is suggested that you start your pull from an area that has the most toner coverage. The image will adhere to the garment.
TIP: Pressing at a lower temperature in all cases will result in a more vivid final product.
Supplies:
- Uninet IColor 560 printer plus ProRIP software – https://shrsl.com/3ttf9
- Uninet IColor Standard 2 Step Weedless Transfer Media for Light & Dark Garments – A4 (8.27″ x 11.69″) – 100 pack (A and B Sheets) – https://shrsl.com/3ttfh
- Heat Press – https://shrsl.com/3ttfm
- Tshirt
- Graphic
- Craft Paper
NOTES: – dull side or powery side of transfer paper is the print side. If you’re not sure which side this is, you can scratch the dull side.
Quick Photoshop Image Editing Steps:
- Find image to use
- Open in Photoshop
- Select Image, Mode, CMYK – do not merge
- Select Image, Mode, RGB again
- Adjust colors/vibrance if desired
- Save image as PNG
Reference
- User manual: https://www.icolorprint.com/resource-library/UNINET_IColor_560_User_Manual.pdf
- Transfer paper instructions: https://www.icolorprint.com/resource-library/IColor_Standard_560_2Step_Textile_Transfer_Paper_Instructions_ICHTSTD_A_B_560.pdf