Have you ever seen a custom print—maybe on a phone case or a metal sign—that was so vibrant and glossy it just popped? And you could touch it right after it was printed without a single smudge? Chances are, you were looking at something made with UV ink.
UV ink, or ultraviolet ink, is a special kind of ink that hardens almost instantly when it’s hit with UV light. This superpower is what makes it a favorite for everyone from industrial printers to home crafters. It’s durable, it’s versatile, and it opens up a world of creative possibilities.
So, let’s dive into what makes UV ink tick, what it’s good for, and what you need to know before you start.
The Magic Behind the Ink: How It Works
Unlike the ink in your desktop printer that dries by slowly evaporating or soaking into paper, UV ink has a much cooler trick. The process is called “curing,” and it happens in a flash.
Imagine this: a specialized UV printer lays down a precise layer of liquid ink onto a surface—let’s say a piece of acrylic. Immediately, a built-in UV light follows right behind, zapping the ink with intense ultraviolet rays. This light kicks off a super-fast chemical reaction. In less than a second, the liquid ink transforms into a solid, durable layer. Because it hardens instantly, the ink has no time to bleed or soak in, giving you incredibly sharp and detailed prints every time.
So, what’s the secret sauce? It’s really a team of four key ingredients working together. You have photoinitiators, which are the heroes that absorb the UV light and start the curing party. Then come the monomers and oligomers, which are the building blocks that link together to form the tough, solid ink layer. Of course, you need pigments to provide the brilliant color. And finally, additives act as the support crew, fine-tuning things like the ink’s flexibility, scratch resistance, or whether it has a glossy or matte finish.
Not All UV Inks Are Created Equal
UV ink isn’t just one thing; it comes in several flavors, each tailored for a specific job.
For projects that need to be tough and scratch-resistant, there’s Hard UV Ink. This is your go-to for things that will be handled a lot, like signs or phone cases. But what if your project needs to bend and flex? That’s where Soft UV Ink comes in. It’s designed to stick to flexible materials without cracking or peeling.
And it’s not just about color. Clear Coat UV Ink is a fantastic tool for adding a protective layer, creating a glossy finish, or even building up cool 3D textures on a surface. For printing on things like food packaging or kids’ toys, there’s Low-Migration UV Ink, which is specially designed with safety in mind to ensure nothing unwanted seeps through. And if you really want to grab attention, Special Effect UV Inks can add finishes like metallic shimmer or even a glow-in-the-dark effect.
The Good, The Bad, and The Practical
So, why are so many people switching to UV printing? The benefits are pretty compelling. The instant-dry nature means you can work incredibly fast, moving from one job to the next without waiting. Because it doesn’t use heat, you can print on sensitive materials that would normally warp or melt. Plus, it’s a cleaner process with very little odor since it doesn’t release the same fumes (VOCs) as solvent-based inks. Above all, the final print is incredibly durable—it’s resistant to scratches, water, and sunlight, so your work stays looking fresh for years.
Of course, nothing is perfect, and there are a few things to keep in mind. UV ink and the printers that use it are more of an investment upfront compared to traditional methods. It’s also not the best choice for every material out there. Since it forms a hard layer, it’s not suited for soft, stretchy fabrics like t-shirts. And most importantly, you absolutely need a special UV printer for this stuff. Please, don’t try pouring UV ink into your regular inkjet—it will not end well!
Is It Safe to Use?
Let’s quickly touch on safety. The good news is that UV ink is much lower in harmful emissions (VOCs) than old-school solvent inks. Once the ink is cured, it’s solid and perfectly safe to handle.
The main precaution is with the uncured liquid ink, which can irritate skin. That’s why you should always wear gloves when you’re changing cartridges or cleaning the printer. As with any craft, just use it in a well-ventilated space and keep it out of reach of kids and pets.
UV Ink vs. Traditional Inks at a Glance
To really see the difference, let’s put UV ink side-by-side with the traditional inks you might be used to.
| Feature | Traditional Inks (Solvent/Water-Based) | UV Ink |
| Drying Method | Dries by evaporation or absorption; takes time. | Cures instantly with UV light through polymerization. |
| Material Compatibility | Works best on porous materials like paper or cardboard. | Adheres to both porous & non-porous surfaces. |
| Durability | May require lamination for scratch or fade resistance. | Forms a solid, scratch-resistant, UV-stable surface. |
| Environmental Impact | May emit VOCs during drying; needs ventilation. | Low-VOC or VOC-free; minimal emissions during curing. |
| Production Speed | Slower due to drying time and potential for smudging. | Faster print turnaround with no drying delays. |
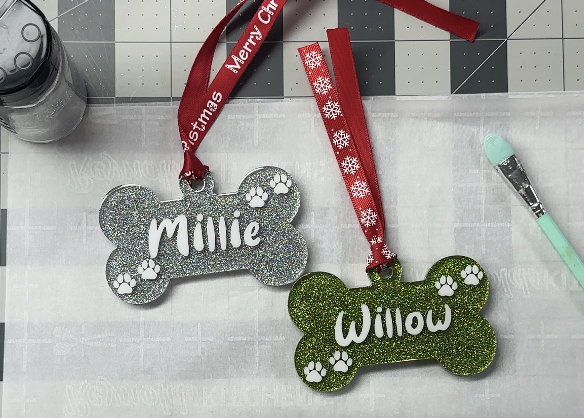
A Fun Application: Making Decals with UV DTF
One of the most exciting ways people are using UV ink is with something called UV DTF (Direct-to-Film) printing. Instead of printing directly onto an object, this method lets you create a super durable, high-quality decal that you can apply to almost anything later.
You use a UV printer to print a design onto a special sheet of film, and then you laminate it to create the finished decal. To use it, you just peel off the back, stick it onto a hard surface like a mug, a laptop, or a glass jar, and press it down firmly. Peel off the top clear layer, and you’re left with a permanent, professional-looking design. It’s a fantastic way to customize curved or tricky surfaces without needing a heat press!
So there you have it. UV ink has truly changed the game in printing, offering speed, durability, and versatility that was once only available to large industrial shops. And now, with more accessible printers hitting the market, it’s empowering small businesses and hobbyists to create amazing, high-quality products right from their own workshops.
The Big Question: Direct Print or a UV DTF Decal?
Alright, so you understand the magic of UV ink—it’s tough, it’s vibrant, and it dries in a flash. But now you come to a fork in the road: Do you print your design directly onto your product, or do you use the UV DTF method to create a super-strong decal to apply later?
Think of it like this: Are you painting a mural directly on a wall, or are you creating a high-quality, precision-cut vinyl decal to stick on it? Both can look amazing, but they are fundamentally different approaches with their own unique strengths and weaknesses.
Direct UV Printing: The “One-and-Done” Approach
When you print directly with a UV printer, you’re doing exactly what it sounds like. You place your item—a phone case, a piece of wood, a metal plaque—onto the printer bed, and the machine applies the ink straight onto the surface.
So, what’s great about this?
The biggest win here is the seamless, integrated finish. The ink is cured right onto the material, so it feels like it’s a part of the object itself. There are no edges to feel, and it has a very premium, professional quality. This is also the only way you can create those cool, built-up 3D textures the article mentioned, by layering clear coat ink to give the design some real dimension. It’s a straightforward, one-step process: you print it, and it’s done.
What’s the catch?
The main limitation of direct printing is that your object has to play by the printer’s rules. First, it has to physically fit inside the machine. If you want to customize a large item, you’d need a very large, and very expensive, printer.
More importantly, direct printing really only works well on flat or slightly curved surfaces. The print head needs to stay at a constant, precise distance from the object. If you try to print on something really curvy or irregularly shaped, like a tumbler or a hard hat, the ink will spray unevenly and you’ll end up with a blurry, distorted mess.
UV DTF Printing: The “Go-Anywhere” Decal
This is where UV DTF comes in and completely changes the game. With this method, you’re not limited by what you can fit in your printer. Instead, you’re printing a decal that can go almost anywhere.
So, what’s the big advantage here?
In a word: flexibility. Because you’re creating a decal, you can stick your design on virtually any hard surface imaginable. That ridiculously curved water bottle? No problem. That oversized piece of equipment? Easy. A whole batch of pens? Done. You’re no longer bound by the size and shape constraints of your printer.
This makes UV DTF the undisputed champion for tackling weirdly shaped items. It’s also fantastic for production efficiency. You can print a whole sheet of logos or designs at once and store them to be applied later, or even sell them as standalone decal products for your customers to apply themselves.
And the downside?
The trade-off for all that flexibility is that it’s a multi-step process. You have to print the design on the film, run it through a laminator to apply the adhesive sheet, and then carefully apply the decal to your object. It just takes a bit more time and effort.
And while these decals are incredibly durable and look fantastic, it is still a decal. If you run your finger over the edge of the design, you can feel that it’s sitting on top of the surface, whereas a direct print is completely seamless. For 99% of applications, this is a total non-issue, but it’s a small difference in the final feel of the product.
So, Which One Is Right For You?
- Go with Direct UV Printing when… you’re working with flat items that fit in your printer and you want that perfectly seamless, integrated feel, or if you want to create cool 3D textured effects.
- Choose UV DTF Printing when… you need to conquer curved or irregular surfaces, customize oversized objects, or want the flexibility to produce decals in bulk for later use.
Ultimately, both methods are powerful ways to create stunning, long-lasting products. The best choice simply comes down to what you’re making!
Craft with Felicia Applauds Eufy E1 Printer as a “Game-Changer” for Affordable UV Printing
Felicia from the popular YouTube channel “Craft with Felicia” has shared her positive impressions of the eufy E1 printer, hailing it as a significant step forward in making UV printing technology more accessible to a broader audience. In multiple online videos and posts, she has expressed her excitement about the machine’s capabilities and its potential to empower crafters and small businesses.
In a YouTube video titled “Why EufyMake’s E1 UV Printer is a Game-Changer + Ink Cost Estimates,” Felicia delves into the printer’s features and her experience with it. Her overall sentiment is one of enthusiasm, highlighting the printer’s ability to bring what was once an expensive and industrial technology into the hands of home-based creators.
While her content suggests a largely positive review, she also provides a practical perspective by addressing topics such as ink cost estimations, a crucial factor for anyone considering the printer for personal or business use. Her analysis aims to give her audience a well-rounded understanding of the eufy E1’s performance and long-term operational costs.
Across her platforms, Felicia’s commentary positions the eufy E1 as a disruptive tool in the crafting world, empowering users with the ability to create high-quality, durable prints on a variety of materials without the prohibitive cost typically associated with UV printing.